Finding the right TV mounting and furniture assembly service can make all the difference in ensuring that your home entertainment system is set up properly and your furniture is assembled correctly. With so many options available, it can be overwhelming to choose the best service that suits your needs. However, with a little guidance, you can easily navigate the selection process and find the right professionals for the job. In this blog post, we will provide you with some useful tips for selecting the best TV mounting and furniture assembly service.
1. Research and Read Reviews
Before finalizing your decision, it is important to research and read reviews about different TV mounting and furniture assembly services in your area. Look for online reviews and ratings on platforms such as Google, Yelp, and Angie’s List. Pay attention to both positive and negative feedback to get a balanced picture of the service’s quality and customer satisfaction level.
2. Ask for Recommendations
Speaking to friends, family, and neighbors who have recently used TV mounting and furniture assembly services can be an excellent source of advice and recommendations. Ask them about their experience, the quality of work provided, and if they would recommend the service. Personal recommendations can give you peace of mind and help narrow down your choices.
3. Check for Licensing and Insurance
Always ensure that the TV mounting and furniture assembly service you choose is licensed and insured. Licensing ensures that the service is legitimate and adheres to industry standards. Insurance protects you from liability in case there is any damage or accidents during the installation or assembly process. Ask the service provider to provide proof of both licensing and insurance before hiring them.
4. Verify Experience and Expertise
It is essential to choose a service provider with experience and expertise in TV mounting and furniture assembly. Look for indications that the professionals have been in the industry for a significant amount of time and have successfully completed similar projects. Ask about their training and qualifications to ensure that they are well-equipped to handle the job efficiently.
5. Inquire About Warranty and Guarantees
A reputable TV mounting and furniture assembly service will offer warranties and guarantees for their work. This ensures that you are protected in case any issues arise after the installation or assembly is complete. Ask about the duration and extent of the warranty and guarantee, including any additional costs that may be involved.
6. Get Multiple Quotes
To ensure you get a fair price for the service, obtain multiple quotes from different TV mounting and furniture assembly services. This will give you an idea of the average cost in your area and help you avoid overpaying. However, it is important to be cautious of significantly low prices as they may indicate subpar quality or hidden charges.
7. Consider Customer Service and Communication
Customer service and communication play a significant role in the overall experience with the TV mounting and furniture assembly service. Look for a company that is responsive, friendly, and easily accessible. Good communication ensures that your requirements are understood, and any concerns or queries are addressed promptly.
8. Evaluate the Range of Services Provided
Before finalizing your decision, consider the range of services provided by the TV mounting and furniture assembly service. Some companies may offer additional services such as wire hiding, cable management, and home theater setup. Assess your needs and choose a service provider that can meet all your requirements, saving you the hassle of involving multiple vendors.
Summary
By following these tips, you can select the best TV mounting and furniture assembly service for your needs. Remember to do thorough research, ask for recommendations, check for licensing and insurance, verify experience and expertise, inquire about warranties and guarantees, get multiple quotes, consider customer service and communication, and evaluate the range of services provided. With the right professionals by your side, you can enjoy a seamless and stress-free installation and assembly process.
Need Furniture Assembly Services in Downtown Chicago, IL?
At Your Service Pros is a locally owned and operated company that values honesty and integrity in all aspects of business. Our dedicated team of professionals have over 15+ years of hands-on experience, to provide innovative ideas and suggestions tailored to your projects. Our services are customized to your individual needs, paying close attention to the details of each project that we are involved with, ensuring full customer satisfaction. Thank you in advance for your business. Contact us today to learn more about what we can do for you! We are looking forward to helping you get your project done with expertise and professionalism!
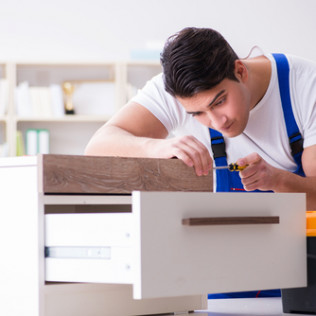
When it comes to furnishing your home with new furniture, one of the first decisions you’ll face is whether to assemble it yourself or hire professionals to do it for you. While do-it-yourself (DIY) furniture assembly might seem like a cost-effective and straightforward solution, it’s important to consider the potential downsides. In this blog post, we’ll explore why DIY furniture assembly may not always be the best option.
1. Lack of Expertise and Experience
Unless you have prior experience in furniture assembly, it’s highly likely that you’ll lack the expertise required to assemble complex furniture pieces properly. Many furniture items come with intricate assembly instructions and require specific tools and techniques. If you’re not familiar with these, you may end up incorrectly assembling the furniture, compromising its stability and durability. It’s worth noting that improper assembly can not only damage the furniture but also void any warranties or guarantees associated with it.
2. Time-Consuming and Frustrating
Even if you’re up for the challenge of assembling furniture on your own, it’s important to consider the amount of time and effort it can consume. DIY furniture assembly often involves deciphering complex instruction manuals, sorting out numerous parts, and spending hours on the assembly process. This can be particularly frustrating and time-consuming, especially if you’re juggling other responsibilities or don’t have the necessary patience to spare.
3. Risk of Injury
DIY furniture assembly often requires lifting heavy objects and using power tools or sharp objects. Without proper training or experience, there’s an increased risk of injury during the assembly process. Moving heavy furniture pieces, especially up staircases or through narrow hallways, can result in strained muscles, back injuries, or other physical harm. Hiring professionals who are trained in handling such tasks can significantly reduce the risk of accidents and injuries.
4. Quality of Assembly
One of the main advantages of professional furniture assembly is the assurance of quality workmanship. Companies specializing in furniture assembly often have trained technicians who are experienced in assembling a wide range of furniture pieces. They possess the expertise needed to ensure that the furniture is assembled correctly, using the appropriate tools and techniques. This attention to detail can significantly enhance the longevity and stability of the furniture, ultimately saving you from the hassle of repairs or replacements in the long run.
5. Stress-Free Experience
By opting for professional furniture assembly services, you can enjoy a stress-free experience from start to finish. Instead of spending hours trying to figure out assembly instructions and dealing with frustrating setbacks, you can sit back and relax while the professionals take care of everything for you. With their experience and efficiency, they can complete the assembly quickly and efficiently, leaving you with a fully assembled and ready-to-use furniture item.
Summary
While DIY furniture assembly might seem like a cost-effective choice at first glance, it’s essential to consider the potential drawbacks. Lack of expertise, time consumption, risk of injury, compromised quality, and added stress are all factors that can make DIY assembly less appealing. Hiring professionals for furniture assembly provides you with the assurance of proper assembly, saves you time and effort, and ultimately enhances the overall quality and durability of your furniture.
Need Furniture Assembly Services in Downtown Chicago, IL?
At Your Service Pros is a locally owned and operated company that values honesty and integrity in all aspects of business. Our dedicated team of professionals have over 15+ years of hands-on experience, to provide innovative ideas and suggestions tailored to your projects. Our services are customized to your individual needs, paying close attention to the details of each project that we are involved with, ensuring full customer satisfaction. Thank you in advance for your business. Contact us today to learn more about what we can do for you! We are looking forward to helping you get your project done with expertise and professionalism!
Mirrors are not only functional but also add style and depth to any space. Whether you want to hang a mirror in your bedroom, living room, or bathroom, it is important to do it properly to ensure safety and achieve the desired aesthetic. In this blog post, we will guide you on the step-by-step process of hanging a mirror, from choosing the right location to securing it properly.
Choosing the Right Location
Before hanging a mirror, it is essential to carefully choose the location where you want it to be. Consider the purpose of the mirror and the type of room you are placing it in.
1. Determine the purpose: Decide if the mirror will serve a functional purpose, such as in a bathroom or dressing room, or if it will be purely decorative. The purpose will help you determine the ideal size and shape of the mirror.
2. Reflect natural light: If you want to make a room appear bigger and brighter, position the mirror to reflect natural light from windows or doors.
3. Complement the room’s décor: Choose a mirror that complements the overall style and color scheme of the room. This will help it blend seamlessly with the rest of the space.
Measuring and Preparing
Once you have chosen the location for your mirror, it is time to measure and prepare the area for installation.
1. Measure the space: Measure the wall area where the mirror will be hung, considering the size of the mirror itself and the desired spacing from adjacent furniture or other wall features.
2. Mark the spot: Using a pencil, mark the center point of the mirror on the wall. This will serve as your reference point for proper placement.
3. Locate studs: Use a stud finder to locate the wall studs near the marked spot. Studs provide additional support and stability for heavier mirrors. If there are no studs in the desired location, consider using wall anchors or toggles for added support.
Hanging the Mirror
Once you have measured, prepared, and located the required support, it is time to hang the mirror.
1. Gather the necessary tools: Ensure you have all the tools required for hanging, such as a drill, screws, wall anchors (if needed), and a level.
2. Create temporary supports: If your mirror is large or heavy, it is important to create temporary supports to hold the mirror in place while you attach it to the wall. This can be done using strips of painter’s tape or sticky putty.
3. Attach hardware to the mirror: Now, attach the mirror hanging hardware, such as D-rings or mirror brackets, to the back of the mirror. Follow the manufacturer’s instructions for the specific hardware you have chosen.
4. Drill pilot holes: Based on the measurements, drill pilot holes into the wall, using a drill bit slightly smaller than the screws or wall anchors you will be using.
5. Secure the mirror to the wall: With the help of a friend or family member, carefully position the mirror on the wall, ensuring that it aligns with the marked spot and sits level. Start by securing the top screws and then align and secure the bottom screws.
6. Double-check stability: Once the mirror is attached, give it a gentle shake to ensure it is securely fastened and doesn’t wobble. If needed, make minor adjustments to make it level.
Finishing Touches
With the mirror securely hung, it is time to add the final touches to enhance its appearance and functionality.
1. Hide hanging hardware: If your mirror came with hardware covers, use them to hide any exposed screws or brackets.
2. Clean and polish the mirror: Give the mirror a thorough clean to remove any fingerprints or smudges. Use a glass cleaner or a mixture of water and vinegar for this purpose.
3. Consider additional decorative elements: Enhance the mirror’s visual appeal by adding decorative elements around it, such as a frame, shelf, or wall sconces.
Summary
Properly hanging a mirror involves careful planning, accurate measurements, and secure installation. By following the steps outlined in this blog post, you will be able to safely and aesthetically hang a mirror in any location, elevating the overall look and feel of your space.
Need Furniture Assembly Services in Downtown Chicago, IL?
At Your Service Pros is a locally owned and operated company that values honesty and integrity in all aspects of business. Our dedicated team of professionals have over 15+ years of hands-on experience, to provide innovative ideas and suggestions tailored to your projects. Our services are customized to your individual needs, paying close attention to the details of each project that we are involved with, ensuring full customer satisfaction. Thank you in advance for your business. Contact us today to learn more about what we can do for you! We are looking forward to helping you get your project done with expertise and professionalism!
Hanging picture frames can be a daunting task, especially if you want to ensure that they are level and securely mounted on the wall. However, with the right tools and techniques, you can easily hang picture frames like a professional. In this blog post, we will guide you through the step-by-step process of hanging a picture frame, from selecting the right location to ensuring stability.
1. Choose the Right Location
The first step in hanging a picture frame is to choose the right location on your wall. Consider the size of the frame and the wall space available. You want to make sure that the frame is not too small for the wall, nor too big that it overwhelms the space. Additionally, think about the height at which you want to hang the frame. Generally, eye level (around 57 to 60 inches from the floor) is a good rule of thumb, but you can adjust it based on your personal preference and the height of surrounding furniture.
2. Gather the Necessary Tools
Before you start the hanging process, gather all the necessary tools. You will need a hammer, a measuring tape, a pencil, a level, and picture hanging hardware such as nails or anchors and screws, depending on the type of wall you have. It’s essential to have everything ready to avoid interruptions during the process.
3. Measure and Mark the Wall
To ensure proper placement, measure the dimensions of your frame and mark the corresponding points on the wall where the top corners will be. Use a measuring tape to measure the desired height from the floor and make a small pencil mark. If you are hanging multiple frames in a gallery style arrangement, mark the positions of each frame accordingly.
4. Attach the Picture Hanging Hardware
Now it’s time to attach the picture hanging hardware to the frame. Most frames will have a hook or wire on the back for easy hanging. If your frame doesn’t have any built-in hardware, you can purchase hanging kits that come with hooks and wire, or adhesive hanging strips for lightweight frames. Use a measuring tape or ruler to ensure the hardware is centered on the back of the frame and securely attach it.
5. Hang the Frame
Once the picture hanging hardware is attached to the frame, it’s time to hang it on the wall. Start by holding the frame against the wall, aligning it with the marked points. Check with a level to ensure that the frame is straight. If you’re hanging multiple frames, you can use a laser level to make the process even easier. Adjust the frame’s position until it’s perfectly level and centered, and then lightly trace along the bottom edge with a pencil.
6. Hammer the Nails or Insert Anchors
Once you’re satisfied with the frame’s position, carefully place it aside, and using your pencil marks as a guide, hammer nails directly into the wall (if it’s made of plaster or drywall) or insert anchors with screws (if it’s a concrete or brick wall). The nails or anchors should be positioned just below the pencil line. Make sure they are in firmly and evenly, ensuring the frame’s stability.
7. Hang the Frame and Check for Levelness
Place the frame back on the wall, aligning the hanging hardware with the nails or anchors. Slowly let go of the frame, ensuring it hangs securely. Use a level to double-check its levelness and make any necessary adjustments. If your frame has a wire, you can also use this step to adjust the tension of the wire for a straight and stable hanging position.
8. Step Back and Enjoy
Lastly, step back and admire your work! Take a moment to ensure that the frame is perfectly level, and that you are satisfied with its placement. If you notice any imperfections, you can always make small adjustments to ensure a flawless presentation. Now you can proudly display your favorite artwork, photographs, or memories on your freshly hanging picture frame.
Summary
Hanging a picture frame may seem like a task that requires professional expertise, but with the right approach and attention to detail, anyone can do it. By choosing the right location, gathering the necessary tools, measuring and marking the wall, attaching the picture hanging hardware, hammering the nails or inserting anchors, and finally hanging and leveling the frame, you can confidently hang your picture frames like a pro. So, grab your tools and give your walls a personal touch with beautifully displayed frames that bring your memories and art to life.
Need Furniture Assembly Services in Downtown Chicago, IL?
At Your Service Pros is a locally owned and operated company that values honesty and integrity in all aspects of business. Our dedicated team of professionals have over 15+ years of hands-on experience, to provide innovative ideas and suggestions tailored to your projects. Our services are customized to your individual needs, paying close attention to the details of each project that we are involved with, ensuring full customer satisfaction. Thank you in advance for your business. Contact us today to learn more about what we can do for you! We are looking forward to helping you get your project done with expertise and professionalism!
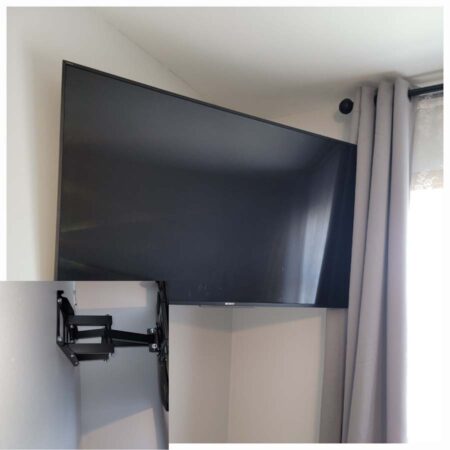
Mounting a TV on the wall has become a popular choice for homeowners looking to save space and enhance their viewing experience. However, mounting a TV is not as simple as just putting it up on the wall. There are important factors to consider and proper techniques to follow to ensure a secure and safe installation. In this blog, we will discuss the proper way to mount a TV, covering everything from choosing the right mounting bracket to the correct height placement.
Choosing the Right Mounting Bracket:
The first step in properly mounting a TV is selecting the right mounting bracket. There are various types of mounts available, such as fixed, tilt, full-motion, and ceiling mounts. Consider the size and weight of your TV, the viewing angle you desire, and the flexibility you need when choosing the appropriate bracket. It is also crucial to ensure that the mounting bracket is compatible with your TV’s VESA pattern, which refers to the four holes on the back of your TV used for attaching it to the mount.
Determining Wall Strength:
Before mounting your TV, it is essential to assess the strength of your wall. TVs can be heavy, and not all walls are strong enough to support them. If you have standard drywall, it is crucial to locate the studs and anchor the TV mount directly into them. Use a stud finder to locate the studs and mark their positions before drilling any holes. If your wall is made of other materials, such as plaster or masonry, consult with a professional to ensure a secure mounting.
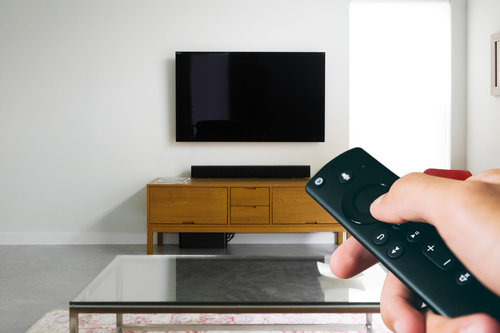
Positioning the TV at the Correct Height:
The height at which you mount your TV plays a significant role in your overall viewing experience. The ideal height is generally eye level when you are seated, ensuring comfortable and ergonomic viewing. Measure the distance from the floor to your eye level and apply this measurement to the center of your TV screen. However, keep in mind that personal preference and the layout of your space might also influence the height placement. For example, if you frequently watch TV while standing, you may choose to mount it higher.
Ensuring Proper Cable Management:
To maintain a clean and organized appearance, proper cable management is essential when mounting a TV. Start by determining the optimal location for your TV and the available outlets. Plan the route for your cables and wires, avoiding any obstructions or dangerous situations. Utilize cable management solutions, such as adhesive cord clips or cable sleeves, to secure and conceal the cables neatly. This will not only enhance the aesthetic appeal of your setup but also prevent any potential tripping hazards.
Securing the TV to the Mount:
Once you have chosen the right bracket and located the studs, it is time to secure your TV to the mount. Follow the instructions provided with the mounting bracket and carefully attach the TV using the correct hardware. Ensure that the TV is level and straight, using a spirit level if necessary. Double-check that all screws and bolts are tight and secure. It is also recommended to have a second person assist you during this step to prevent any accidents.
Testing and Adjustments:
After mounting your TV, it is essential to test and make any necessary adjustments. Carefully inspect the TV and mount to ensure that they are holding securely in place. Test the tilt, swivel, or full-motion features if applicable to your chosen bracket. Power on the TV and check the picture quality and visibility from different angles to ensure optimal viewing. Take the time to make any needed adjustments to achieve the best possible setup.
Summary
Mounting a TV requires careful consideration and following the proper techniques. Choose the correct mounting bracket, assess the wall strength, position the TV at the appropriate height, manage the cables efficiently, and securely attach the TV to the mount. Take the necessary time and precautions to ensure a safe and successful installation. By following these guidelines, you can enjoy your TV viewing experience to the fullest while maintaining a sleek and organized space.
Got Questions? Let Us Help!
At Your Service Pros is a locally owned and operated company that values honesty and integrity in all aspects of business. Our dedicated team of professionals have over 15+ years of hands-on experience, to provide innovative ideas and suggestions tailored to your projects. Our services are customized to your individual needs, paying close attention to the details of each project that we are involved with, ensuring full customer satisfaction. Thank you in advance for your business. Contact us today to learn more about what we can do for you! We are looking forward to helping you get your project done with expertise and professionalism!